Battery switch on travel trailer function is crucial for managing your RV’s power. This guide will walk you through understanding how these switches work, different types available, safe operation procedures, and troubleshooting tips. We’ll cover connecting and disconnecting batteries, maintenance, and even integrating your switch with other systems like solar panels. Get ready to become a battery switch pro!
Whether you’re a seasoned RVer or a newbie, mastering your travel trailer’s battery switch is essential for safe and reliable power. From understanding the basics of single versus dual switches to troubleshooting common problems, this guide will equip you with the knowledge to confidently manage your RV’s electrical system. We’ll cover everything from proper connection and disconnection procedures to preventative maintenance and replacement techniques.
Understanding Battery Switch Functionality in Travel Trailers
Your travel trailer’s battery switch is a crucial component for managing your power supply. It allows you to easily disconnect your house batteries from the rest of the electrical system, preventing unwanted drain and protecting your batteries from damage. Understanding its function and proper operation is essential for maintaining your trailer’s electrical system and ensuring a smooth camping experience.
Battery Switch Types and Purposes
A battery switch’s primary purpose is to isolate your trailer’s house batteries from the electrical system. This is vital for preventing parasitic drain – the slow discharge of your batteries when the trailer is not in use. This drain can occur from small appliances or electronics that are drawing power even when switched off. Different types of switches offer varying levels of control.
A single battery switch simply connects or disconnects your battery bank from the trailer’s system. Dual battery switches allow you to isolate two battery banks independently, often used in trailers with larger power demands or those using a combination of deep-cycle and starting batteries. Rotary switches are the most common type, offering multiple positions for different configurations. Some newer trailers even incorporate electronic switches controlled via a panel or app.
Operating a Typical Rotary Battery Switch
Most travel trailers utilize a rotary battery switch. These switches typically have three positions: “Off,” “Battery,” and “Both.” The “Off” position completely disconnects the house batteries from the system. The “Battery” position connects only the house batteries to the trailer’s 12-volt system. The “Both” position connects both the house batteries and the tow vehicle’s charging system (if equipped) to the trailer’s 12-volt system.
To operate the switch, simply rotate the handle to the desired position. You’ll usually hear a click as the switch engages. Always confirm the switch is in the correct position before leaving your trailer unattended for extended periods.
Safety Precautions When Working with Battery Switches and Batteries
Working with batteries and electrical systems requires caution. Always wear safety glasses to protect your eyes from potential sparks or acid splashes. When disconnecting or connecting batteries, ensure the switch is in the “Off” position to prevent accidental shorts or electrical shocks. Never touch the battery terminals with bare hands or conductive materials, as this can cause burns or injury.
If working on the battery system, use insulated tools to prevent electrical shocks. Be aware of the potential for hydrogen gas buildup around batteries, which is flammable. Ensure adequate ventilation when working near batteries. If you’re unsure about any aspect of working with your battery system, consult a qualified RV technician.
Connecting and Disconnecting Batteries
Properly connecting and disconnecting your travel trailer’s batteries is crucial for safety and to ensure the longevity of your battery bank. Incorrect procedures can lead to damage, sparks, and even fire. This section Artikels safe practices for both connecting to shore power and disconnecting for long-term storage.
Connecting to Shore Power and Managing Battery Power
When you arrive at a campsite with shore power, the first step is to connect your RV to the power source. This typically involves plugging your RV’s power cord into a 30-amp or 50-amp outlet. Once connected, your converter will begin charging your batteries. Many RVs have a battery switch that allows you to isolate the batteries from the rest of the electrical system.
Leaving the battery switch “on” while connected to shore power allows the converter to charge your batteries. If you plan to use significant amounts of 12V DC power (like running a water pump or lights while connected to shore power), keeping the battery switch on will allow you to draw power from both the shore power and the batteries simultaneously, preventing the batteries from being fully depleted.
So, you’re an audiophile who travels? Awesome! Check out this guide on audiophile travel setups for tips on packing your precious gear. It’s all about finding that sweet spot between portability and sound quality. Then, once you’ve got your travel setup dialed in, head over to this other audiophile travel setup resource for ideas on listening locations while you’re exploring new places.
Think amazing soundscapes combined with incredible views – the ultimate audiophile adventure awaits!
However, if you anticipate being connected to shore power for an extended period and aren’t using much 12V power, you may choose to turn the battery switch off to prevent overcharging and extend battery life.
Disconnecting Batteries for Long-Term Storage
Before storing your travel trailer for an extended period, disconnecting the batteries is essential to prevent battery drain and potential damage. This involves turning off the battery switch to completely isolate the batteries from the RV’s electrical system. After turning off the switch, it’s advisable to disconnect the negative (-) battery cable from each battery. This ensures a complete break in the circuit and prevents any accidental short circuits.
Remember to label the cables clearly before disconnecting them to ensure correct reconnection later. For long-term storage (several months or more), it’s a good idea to use a battery tender or trickle charger to maintain a proper charge level and prevent sulfation.
Potential Issues from Improper Battery Connection/Disconnection
Improper battery connection can result in several issues, including: sparking, which can ignite flammable materials near the battery; damage to the battery terminals or cables due to incorrect polarity; short circuits leading to blown fuses or damaged electrical components; and, finally, damage to the battery itself, shortening its lifespan or rendering it unusable. Improper disconnection can also lead to the battery slowly discharging, potentially damaging it.
So, you’re an audiophile who travels? Awesome! Check out this guide on building the perfect audiophile travel setup for pristine sound on the go. It covers everything from portable DACs to noise-canceling headphones. But if you’re looking for more travel-specific tips and tricks, then head over to this other great resource on audiophile travel setups that focuses on packing strategies and maintaining sound quality while you’re exploring new places.
Seriously, don’t leave home without it!
Battery Connection and Disconnection Checklist
Before connecting or disconnecting your batteries, it’s always best to follow a checklist to ensure safety and prevent mistakes.
- Turn off all appliances and electronics in the RV.
- Locate the battery switch and ensure it is in the “off” position before disconnecting batteries.
- Wear safety glasses to protect your eyes from potential sparks.
- Use insulated tools to prevent electrical shocks.
- Disconnect the negative (-) terminal first when disconnecting batteries.
- Connect the positive (+) terminal first when connecting batteries.
- Double-check the connections to ensure proper polarity (+ and -).
- Inspect the terminals and cables for any signs of damage or corrosion before and after connection.
- After connecting, turn the battery switch to the “on” position to restore power.
Battery Switch Maintenance and Replacement
Proper maintenance and timely replacement of your travel trailer’s battery switch are crucial for ensuring reliable power and preventing potential electrical issues. Neglecting this vital component can lead to dead batteries, system malfunctions, and even fire hazards. This section details the necessary steps for maintaining and replacing your battery switch.
Regular Battery Switch Maintenance
A simple, regular maintenance schedule will significantly extend the lifespan of your battery switch. This involves visual inspections and occasional cleaning. Inspect the switch for corrosion, loose connections, or any signs of damage at least twice a year, or more frequently if you use your trailer in harsh environments. Clean any corrosion from the terminals and switch housing using a wire brush and baking soda solution.
Apply a dielectric grease to the terminals after cleaning to prevent future corrosion. This simple routine can prevent many problems down the line.
Replacing a Faulty Battery Switch
If your battery switch fails, replacing it is often a straightforward process. However, always disconnect the negative battery cable before beginning any work on the electrical system. This prevents accidental shorts and protects you from electric shock. The exact steps will vary slightly depending on the type of switch you have, but generally involve removing the old switch, carefully noting its wiring configuration, and installing the new switch, ensuring the wiring is connected correctly.
Consult your trailer’s wiring diagram if you encounter any difficulty.
Selecting the Correct Replacement Battery Switch, Battery switch on travel trailer function
Choosing the right replacement is essential for safe and effective operation. The most important factor is the switch’s amperage rating. This rating must be equal to or greater than the amperage draw of your batteries and electrical system. You’ll typically find this information on the old switch or in your trailer’s documentation. Also, consider the type of switch; some are simple on/off switches, while others offer more sophisticated features like a battery combiner.
Select a switch that matches your needs and trailer’s configuration.
Tools and Materials Needed for Battery Switch Replacement
| Tool | Description | Quantity | Source |
|---|---|---|---|
| Wire Brush | For cleaning battery terminals | 1 | Auto parts store, hardware store |
| Socket Wrench Set | To remove and install switch mounting bolts | 1 | Auto parts store, hardware store |
| Screwdrivers (Phillips and Flathead) | For removing and installing wire connectors | 1 of each | Auto parts store, hardware store |
| Pliers | For working with wire connectors | 1 | Auto parts store, hardware store |
| Dielectric Grease | For protecting battery terminals from corrosion | 1 tube | Auto parts store, hardware store |
| Replacement Battery Switch | With appropriate amperage rating | 1 | RV parts store, online retailer |
| Wire Connectors | If needed to replace old connectors | As needed | Auto parts store, hardware store |
| Multimeter (Optional) | To test battery voltage and switch functionality | 1 | Electronics store, online retailer |
Battery Switch and Related Systems Integration
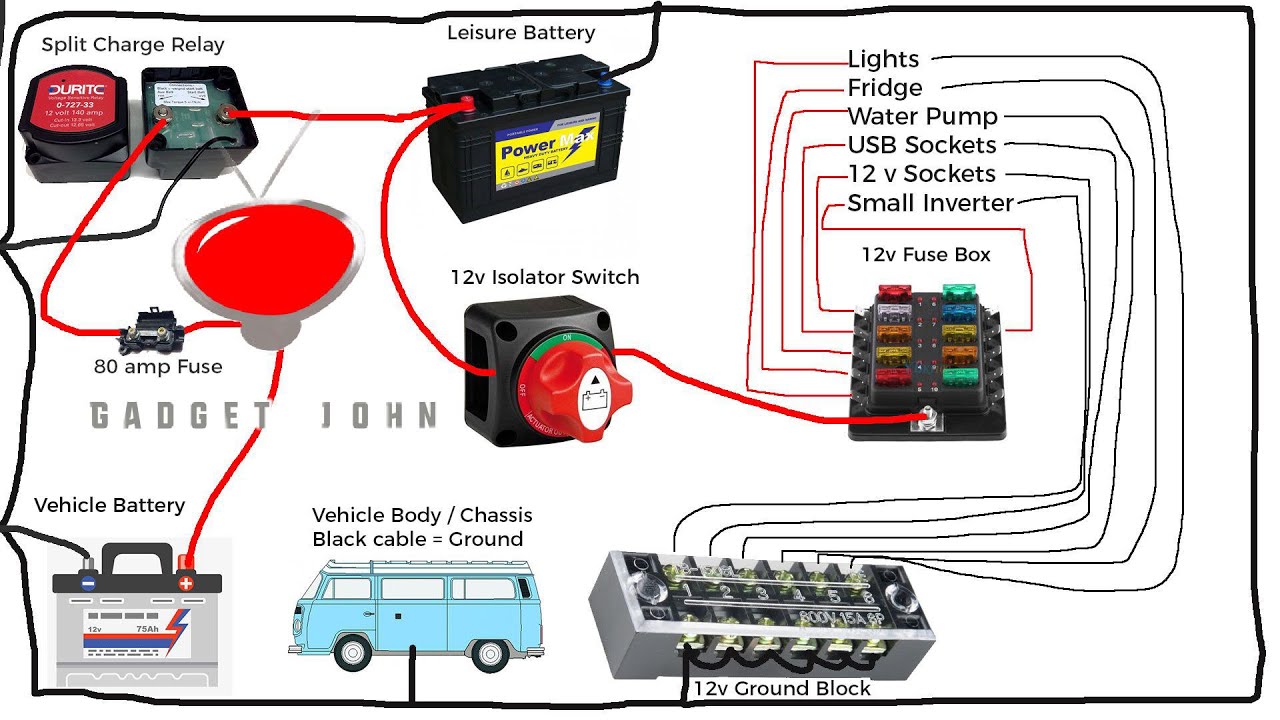
The battery switch isn’t an isolated component in your travel trailer’s electrical system; it’s a central hub that dictates how power flows between your batteries and other crucial systems. Understanding its interaction with these systems is key to maximizing your trailer’s power management and preventing issues. This section will explore how the battery switch works in conjunction with solar panels, converters, and other components, explaining its role in charging and power consumption.The battery switch acts as a gatekeeper, controlling the flow of power from your batteries to the trailer’s various electrical components.
When the switch is in the “off” position, it isolates the batteries, preventing accidental discharge. In the “battery” position, power from the house batteries directly feeds the trailer’s 12V system. The “both” or “combined” position connects both the house batteries and the tow vehicle’s charging system (often through a dedicated charging line) to the trailer’s 12V system, allowing for charging and powering of appliances simultaneously.
The “shore power” position (if equipped) connects the trailer’s 12V system to the shore power converter, enabling charging of the batteries via AC power. Crucially, the switch’s position directly influences how charging systems interact with your batteries.
Battery Switch and Charging System Interaction
The battery switch significantly affects how your batteries are charged. When the switch is in the “battery” position, only the alternator (if connected via a charging line) or solar panels (if installed) can charge the batteries. Selecting “both” or “combined” allows both the alternator and the converter (when plugged into shore power) to charge simultaneously, providing faster charging.
The “shore power” position prioritizes charging from the converter, often bypassing the alternator and solar input until the batteries reach a certain charge level. Improper switch usage can lead to inefficient charging or even damage to the batteries or charging system. For example, leaving the switch in the “both” position while not connected to shore power could lead to excessive drain on the tow vehicle’s battery.
Comparison of Battery Charging Systems
Travel trailers utilize various battery charging systems. The most common include:
- Three-Stage Charging: This system employs three stages: bulk charging (rapidly charging the batteries), absorption charging (maintaining a constant voltage), and float charging (maintaining a trickle charge to compensate for self-discharge). This is generally considered the most efficient and battery-friendly method.
- Alternator Charging: This relies solely on the tow vehicle’s alternator to charge the batteries via a dedicated charging line. It’s a simpler system but can be less efficient and may not fully charge the batteries on shorter trips.
- Solar Panel Charging: Solar panels provide a clean and renewable source of charging power. The charging process is similar to alternator charging, though it’s dependent on sunlight availability. Often used in conjunction with other charging systems.
- Converter Charging: Shore power converters transform AC power from campsites or RV parks into DC power to charge the batteries. This is typically the most efficient method when available.
The effectiveness of each system depends on factors like battery type, solar panel capacity, alternator output, and converter wattage. A combination of systems often yields the best charging performance.
Battery Switch and Power Consumption Management
The battery switch plays a vital role in managing power consumption. In the “off” position, it completely isolates the batteries, preventing accidental drain. Selecting “battery” allows direct use of battery power for appliances. “Both” or “combined” allows for simultaneous charging and usage, while “shore power” prioritizes charging from shore power, thereby reducing the load on the batteries. Careful selection of the switch position based on the available power sources and the level of power consumption is crucial for avoiding battery drain and ensuring sufficient power for your appliances.
For instance, running multiple high-draw appliances (like air conditioning) on battery power alone could quickly deplete the batteries, necessitating careful power management.
Understanding your travel trailer’s battery switch is key to a smooth and safe RVing experience. By following the guidelines in this guide, you’ll be able to confidently manage your power, prevent issues, and extend the life of your battery system. Remember, regular maintenance and safe operating procedures are crucial for avoiding problems and ensuring you always have power when you need it.
Happy travels!
FAQ Insights: Battery Switch On Travel Trailer Function
What happens if I leave my battery switch on all the time?
Leaving your battery switch on constantly can drain your batteries, especially if you’re not connected to shore power. It’s best to turn it off when not using the trailer for extended periods.
How do I know if my battery switch is bad?
Symptoms of a bad battery switch include no power to the trailer, blown fuses, or inconsistent power. Use a multimeter to test the switch’s continuity and voltage.
Can I use a different type of battery switch than what came with my trailer?
While you can replace it, ensure the replacement switch has the correct amperage rating and wiring configuration to match your trailer’s electrical system. Consult your trailer’s manual or a qualified electrician if unsure.
My battery switch is making a clicking noise. What’s wrong?
A clicking noise often indicates a problem with the switch itself or a low battery voltage. Check your battery voltage and inspect the switch for any damage. If the problem persists, replace the switch.
